Menu
 The last six weeks has been more difficult than usual as we recover from our big forest fire. It was actually a little one for the forest, clocking in at under 10 acres, but it was big to us given the circumstances. Apparently when you are evacuated from a deep sleep to a 20-foot towering infernal licking at your entry gate (which is also your only exit from the property), your body goes into a bit of a fight or flight response and I can assure you that we flew out of there that night:
I yelled at the other adults: “Come now! As you are.” I ushered the boys to the car, on that “seat belts optional” occasion. “Buckle as we leave!” I gave the car a few honks thinking another adult might jump in and then I drove away. The other adults had cars and we had discussed this scenario: An emergency evacuation with no notice. I would take the kids and get the heck out. The poor kids didn’t realize the more general plan and began to sob about leaving their family behind. Needless to say, there was a bad moment or two in the whole situation.
A minute down the road I passed the first responder — the deputy sheriff. He passed my car, taking note of its young occupants. “Good idea,” he said to me as he crossed us off his mental list. He knew all of the evacuees personally that night in this little community and was taking his inventory.
All of this is to say that the doctor tells us that the reason none of us have slept in the last six weeks and that our blood pressure is unusually high (160/90 — ouch!) is that our bodies are still recovering from the terror of our early morning surprise and that sleep should come at some point and so we wait. (I have included fire photos below for the curious.)
As I wait for normalcy, I figure I might as well take on a project to improve my health (or at least to make me smile in the short term). The strange fall weather has also tricked some of our plants into believing it is spring, leaving me with a spring-like herb option: Lavender, rosemary, and sage are blooming and scream to be turned into hydrosols.
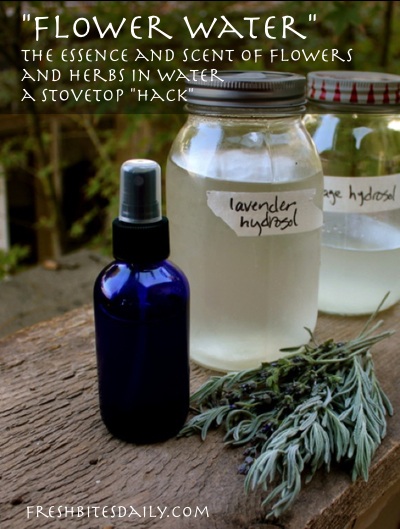
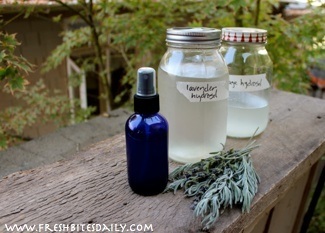 Hydrosols are “flower waters,” distilled herbal waters that are water-based siblings of essential oils, mixed with just a touch of oil. They are far more exciting than essential oils in my opinion because you get to create them on your own stove top, filling your house with the fragrance of the herbs. If you harvest the herbs yourself then you have the added benefit of fresh air, fragrance-filled air, a bit of squatting and bending, and sticky hands coated in herbal oils. It’s a good gig.
It’s a bonus, really, that you end up with an herbal spray that you can enjoy for weeks. I use the sprays on my face and hair. My boys line up, close their eyes, and get their faces sprayed. As for spraying what and when with your hydrosols, I love this article by the master Jeanne Rose (here). (Jeanne Rose, not to be confused with my own mom and writer on this website, Jeanie Rose, who also had a prolific herb business in the 1970s.)
When you buy a hydrosol it is often made in a large copper still by an herbal crafts person. If you have a still, I look forward to an invitation in visit. If you don’t have a still, you can still have a great deal of fun on your own stove top with a hydrosol hack, using simple components you already have in your kitchen.
Give the whole process about two hours though your actual hands-on time will be about 15 minutes. You may spend a few more minutes depending on your herb and how simple it is to harvest.
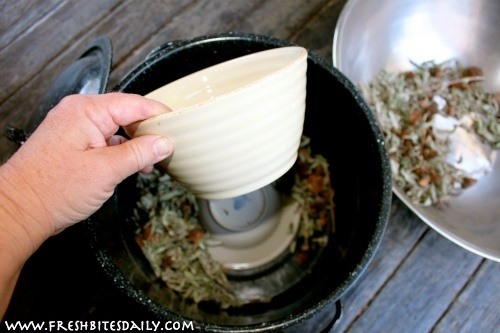
Choose two small bowls to fit this criteria: both must fit in your soup pot. The first will be placed upside down in the bottom of the pot. Its main purpose is to keep your second bowl off the direct heat of the bottom of your pot. Your second bowl sits upright on top of the first and will collect your hydrosol. It should not be so wide as to cover the width of your soup pot. Steam will rise from below to the lid of your pot and should be free to rise around this bowl. I have a nice deep but narrow bowl I use for this purpose.
Wash your pot, bowls, and lid. Rinse with hot water.
Place your first bowl upside down in the pot. Place your herb around the lower bowl. Add water enough just to cover your herbs. (Too much water will just dilute the herbal nature of your hydrosol.)
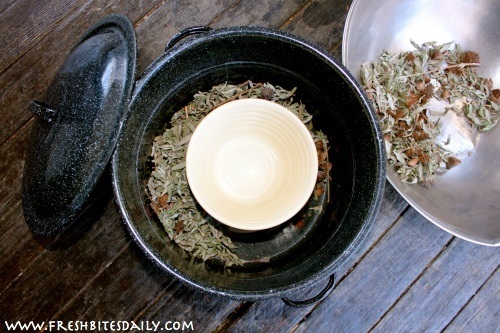
Place the pot on the stove, cover, and turn on the heat. Bring the mixture to a boil and then turn down, allowing it to simmer and build up steam. I usually start on a high heat to get it started and then turn down to a medium heat.
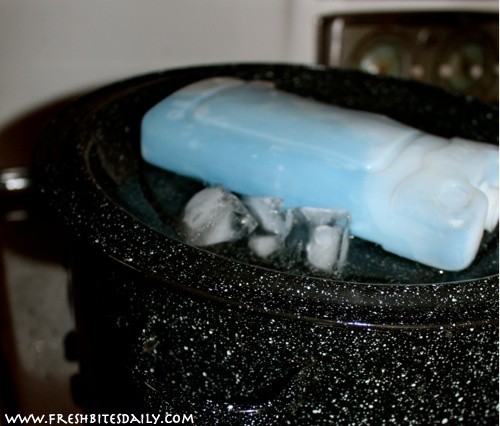
As your mixture builds to a boil, prepare your ice. To aid in the condensation, you will place ice on top of your lid. This is where you will appreciate the design of some of the lids in your kitchen. Choose a lid that does not have a steam hole (as with the lids on rice cookers) and choose one that is domed, not flat. You will place your lid on your pot upside down. The dome shape will allow a little reservoir on the top of your pot for your ice. As steam rises inside of the pot, it will hit the cold top, condense, and fall down into the capture bowl below. With the domed lid, your liquid inside will fall directly into the bowl placed under it because the water will drip down the dome-shape on your lid before it drips into the capture bowl.
Back to the ice. I recommend that you place ice in a zipped baggie to make for easier management. Have at least one additional bag with ice ready when your first one melts. Have additional ice ready as well. You could potentially go through a lot of ice depending on how big your batch actually is and if you stay on top of it. The reality in my household is that I get distracted and come back to melted, warm, formerly ice water and then make the switch.
You can see below that I’ve used “blue ice” as well. Experiment and do what works for you.
Simmer and collect your hydrosol until you have enough, until your water nearly boils out, or until you get tired of the whole thing. We have so much herb material on our property that I usually fall into the “tired of it” category. There is an ocean of herbs here should I want to make more hydrosol later.
At this point, you have a bowl full of hydrosol in your upper “capture” bowl. Remove it carefully from your set-up and allow it to cool. Jar it and store it in your refrigerator for a month or so if you’ve made a large quantity. Add some to a small mister bottle to use immediately.
How long can you keep this stuff in the refrigerator? I mentioned “a month” above but it may be longer. You will know if it “turns” by either the smell or if it starts “blooming.” In fermentation we notice “blooms” usually first by a “cloudy” material that forms on the liquid. That is a sign that your hydrosol is beginning to grow some unwanted bacteria. With either of these signs, I would make a new batch. The hydrosols you buy may keep much, much longer but they are made in actual stills, temperature-monitored for an optimum product. You could probably use the stove top method and optimize your sanitation and temperature for a longer shelf life but if you’re only making a pint or quart at a time, it probably isn’t worth the fuss.
Distillation is a complex process and getting the most out of your herb — an optimized fragrance or other quality — may require more precision equipment, particularly a temperature monitor. This hack is a fun way to experiment and decide if you are ready for some “big kid” equipment. Viewed in that spirit, this is a great project and one I recommend highly.
Fight Bad Breath with this Homemade Mouthwash, Natural and Antiseptic
A natural mango lip scrub to put an end to winter’s chapped lips (in a lesson from India)
A graphic picture as evidence that prevention is easier than treatment when it comes to skin cancer (and a simple remedy you can try today)
Capture the fragrance of your favorite flower and keep it in your pocket
A luxurious homemade rose facial cream to fight off dryness and aging (in a recipe from India)
A rose-based facial toner with a variation for dry skin (in a lesson from India)
Your next floral-infused massage oil (also a bonus moisturizer)
Perfume Bottles For Your Essential Oils